

Because of a number of rigorous safety measures Apple integrates into its computer systems, Macs are usually thought of among the many most secure programs. Nevertheless, there’s all the time a possibility for malware and malicious risk actors to achieve entry to your Mac. Counting on the built-in safety features defending your system could also be nicely and good, however it may be helpful to manually verify whether or not a virus or malware has infiltrated your system with out being detected.
Right here’s the way to verify your Mac for viruses and malware.
Efficiency downgrades
One of many indications of attainable malware and viruses infecting your Mac is a notable discount in efficiency pace. Among the finest methods to look into precisely what’s inflicting your Mac’s CPU to carry out in a sluggish method is by way of an app in your Mac known as Exercise Monitor.
Step 1: Open Functions > Utilities > Exercise Monitor or press Command-House to open Highlight and seek for “Exercise Monitor.” Double-click the app to open it.
Step 2: Within the Course of Title subject situated beneath the CPU tab (which must be chosen by default), look by no matter is listed and the way a lot of the CPU proportion it requires to function. For those who’re uncertain of any of the method names, merely kind them into Google, which is able to inform you whether or not it’s one thing you ought to be anxious about or not.
Digital Tendencies
Step 3: For those who do find any dangerous apps and malware inside Exercise Monitor, click on the merchandise after which choose the X button on the top-left to terminate it.
Step 4: Equally, open the Reminiscence tab and analyze the Course of Title part to see if there are any unknown or uncommon course of names you don’t acknowledge which can be demanding a substantial quantity of reminiscence utilization.
Step 5: Notice that forcing a malicious app to shut would possibly briefly clear up the issue, however there’s each likelihood that if malware is in your Mac, the app will open up once more and resume its nefarious actions. For a extra everlasting answer, head to the Antivirus and malware scanner apps part on the backside of this information.

Picture used with permission by copyright holder
Browser extensions
When downloading apps, you’ll be able to limit your Mac to solely put in apps from the App Retailer. There is not any such choice for browser extensions, although — you’ll be able to set up them from third-party web sites and shops — that means there’s an opportunity you’ll be able to find yourself including one thing malicious to your laptop.
For those who’re utilizing Google Chrome, for instance, click on the three dots on the far proper facet of the app, then choose Extensions > Handle Extensions.
Scan by your browser extensions and take away any suspicious extensions which were added.
Suspicious apps and downloads
Checking the checklist of put in purposes in your Mac must be one thing that’s carried out regularly to ensure you positively put in all of them and nonetheless need them put in.
Step 1: Open the Functions folder, situated within the left sidebar of Finder.
Step 2: Search for any apps you didn’t set up your self. Proper-click an app you wish to take away and choose Transfer to Trash. Don’t neglect to empty the trash to completely delete the app out of your system.
Step 3: Naturally, any file downloaded from an unknown or untrusted supply can doubtlessly include malware and viruses. Ever had a pop-up seem in your internet browser that mechanically downloads a file with out your permission? Go to the Downloads folder in your Mac and delete something you didn’t obtain your self. As is the case with purposes, you’ll want to empty the trash for those who do take away any specific recordsdata.
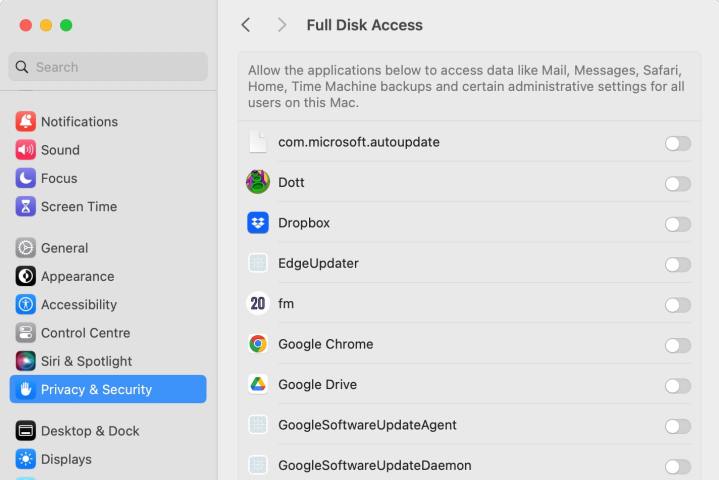
Full Disk Entry
Full Disk Entry is a characteristic that lists all of the purposes which have unrestricted entry to your Mac. Risk actors that create dangerous trojans, spy ware, keyloggers, and many others., will in the end goal to achieve entry to this space because it basically makes them the system administrator. In the event that they’re profitable, they’ll inflict some critical injury. Subsequently, if malware or a virus has certainly made its approach onto your system, it might seem right here.
Step 1: Open the System Settings app and go to Privateness & Safety > Full Disk Entry.
Step 2: Right here, you’ll be able to verify which apps of yours have full entry to your Mac’s disk. You’ll be able to briefly revoke entry by switching the toggle to the disabled place, or take away an app from the Full Disk Entry part totally by choosing it, then selecting the Minus button on the backside of the checklist.
Step 3: If an app is listed within the Full Disk Entry part and also you don’t acknowledge it, ensure you take away it out of your system utilizing the above strategies.
Digital Tendencies
Login Objects
One other strategy to manually verify for malware on a Mac is thru Login Objects. As its identify suggests, it controls which purposes boot up alongside your system. Utilizing this characteristic may also show to be an efficient strategy to verify your Mac for viruses and malware.
Step 1: Open the System Settings app and go to Normal > Login Objects.
Step 2: Examine the checklist on the prime of the app. For those who do not acknowledge any entries, Google them to verify what they’re. If they’re malware (otherwise you merely do not want them to load whenever you begin up your Mac), choose them, then select the Minus button on the backside of the checklist. If an app or course of seems to be malicious, take away it utilizing the steps above.

Digital Tendencies
Antivirus and malware scanner apps
For those who do suppose you’ve a malware an infection, it’s essential to know the way to take away it. Alongside the handbook strategies listed above for checking malware, there are a large number of Mac-based antivirus and malware scanners. One such app is the favored Malwarebytes, which helps you to scan your Mac at no cost (it additionally has a paid-for model).
Step 1: Obtain and set up the app.
Step 2: Run the scan and await the outcomes.
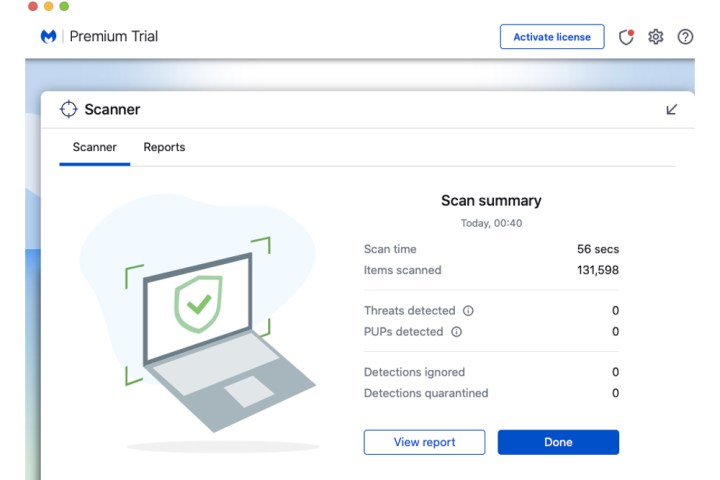
Picture used with permission by copyright holder
Step 3: If there are any malicious recordsdata similar to adware or spy ware found by Malwarebytes, choose the Quarantine Chosen or Delete button to take away all of them out of your Mac.
Premium applications are additionally efficient in rooting out any malware and viruses. As a common rule of thumb, contemplate buying apps from main digital safety firms similar to McAfee, Norton or Bitdefender.
Editors’ Suggestions
